Showing posts with label Arts and Crafts. Show all posts

Sunday, February 13, 2022

Thank You Card

Hello Friends!

I am sharing a Thank You card today. Its made out of left over scraps.

The dimensions of card are 7 X 11 cms after folding. So this may qualify as a Slim Line Card. When I am working with scraps, I don't stick to standard sizes. I don't want to cut off pieces if it is not necessary. Why waste the product as well as money?

Thank You Card

Thank You Card
As you can see the top folding is 1 cm less than the bottom fold, to show the chevron tape added to the inside of the bottom fold.

I drew the flowers with fine tipped black ink pen and then filled in the colours with inks pens. 

I did not use any fixative to protect the drawing. 

Then I cut off  using scalloped oval dies. 

Hand Drawn Flowers

Here is a closer look. I am not a great artist. I just doodle it. Moreover I am self taught so my skills are not that perfect.

Actually I doodled lot of flowers and other images sometime back on white card stock scraps. I prefer white card stock as base as they go easily with any other colours and can also be coloured if required.

You know I love to watch old movies with my mom in the afternoons. That's the time we spend together. So while watching it I sometimes take up the drawing and sketching activities. 

Also when I am not able to or don't feel like crafting, I prefer to create some of these so that I can use them later on as card toppers. 

Only problem is that if I don't space the images properly, it is quite difficult to die cut them. I am not so adept at fussy cutting.

Its good to have stock of such images as you can easily create a card in emergency.

Stamps are so costly, especially when they are branded ones. I can't spend so much money on them. It takes time to build a stash of craft materials. 

When I started crafting, there were not many online shops. The few shops were only selling branded stamps. So I prefer drawing my own images. 

Since the flowers were pink, I used matching pink coloured card stock. In fact I was too glad to use my florescent card stock. It is very difficult to use them in card making as colour combos are difficult to match.

Card Insert

For the card insert, I added a punched out matching pink paper.

Envelope

This is the matching envelope I made my self. It has punched border on the flap.

Card-Envelope

So this the final product. Hope you like them. Please do leave your comments/suggestions.

Thanks a lot for all your love and support. Please keep on supporting my work.

Materials Used:
  • Florescent Pink Card stock
  • White Card Stock Scrap
  • Chevron printed tape
  • Scalloped Oval Dies (unbranded)
  • Sentiment stamp
  • Black Ink
  • Light Pink coloured Paper For envelope and Insert
  • Small Border Punch
  • Corner Rounder Punch
Hand Drawn Flowers:
  • Black Ink pen Fine
  • Yellow, Pink, Green Colour Pens


Pin It

Monday, June 9, 2014

My Craft Classes...1


This is the punch craft class I taught to beginners. I always keep a huge supply of the punched out shapes ready to use by the kids. Though the kids do try to punch out the shapes, after some time they get bored. Also some of the punches are difficult for them to punch as they may be hard. They just want to get on with their creative work. So they prefer to use the ready to use punched out shapes instead of punching them by themselves.
Here is one card made by my niece in one of my classes. 

My niece also doesn't waste time in punching out the shapes. She is interested in finishing off her creation fast like all other kids. But when she feels like, she punches out some shapes and refills my box for use next time.

The card used was baby pink textured card stock. She used paper rope or paper twine for stems and punched out flowers and butterflies. 
Here she used one of my templates-a circle in a square. I keep various shaped cards or other thick materials which I come across, for using them as templates. It is easier that way than making one. Before I realised, she had coloured and glued it to the card. So there was no way, I could take it back with out damaging the card. She glued some butterflies on it.
She did try to give shape to a few flowers using the tools, but instead she glued them to the rope in such a way that they looked as if shaped out by using tools.

I think, she had a clear idea what to do and how to do from the beginning and finished off her work very quickly. I liked her card. Very neat and simple. What do you say?

More in my next post.....

Sunday, June 8, 2014

What I Was Doing....III


I also taught them some flower making in one of my classes. Here is a glimpse..

I don't have many pictures as I was kept on my toes through out by the little ones....

Some more next time.....


Pin It

Thursday, June 5, 2014

What I was Doing....II

In one of my classes, I taught them making Book Marks. Alas, I don't have many pictures. I could only take very few, as I had to help them with their creations. 

This little one is so engrossed in decorating one book mark for his little sister. His sis was 3-4 years old and kept on crying saying that she missed her mom. I had her sit on my lap through out the class so that she did not feel lonely or frightened. Only then she stopped crying. It was difficult for me to help the children in making the crafts but we all managed very well in the end with some help from the older kids. 
This was one made by one of the students and decorated with smilies, stickers and punched out circles.
Here is one decorated with sketch pens and smilies. Sorry for the poor picture quality.

Some more in my next post....

Wednesday, June 4, 2014

What I was doing....I


Hi there. I have been away for a long time. I was busy with cleaning of my home, organising (which is going at a snails pace) other works and recovering my health. My health suffered again. I was also a victim of sunstroke. How much it saps your energy is something one cannot imagine, unless one goes through it.

Between this and other chaos, I taught in summer camps.

Though I could not do what all I wanted to, because of my health and scorching summer heat, I enjoyed working with kids as well as adults teaching, arts and crafts.

My kids group ranged from 4 to 14 years. For my first class I was very nervous..as if entering some competition.

Working with kids was fun but very taxing. You have to control them gently and see that they don't injure themselves(But they do get messy any way :)). They are very creative and very fast. There is always, chaos, confusion and lots of talking and bantering going on. So they miss some of the instructions and I had to repeat myself many times. With the small ones, they are very adamant on doing every thing on their own but in the end ask me to create one piece for them to take home to their mom :) :) 

Though I demonstrated various techniques and crafts, I gave them a free hand and was amazed to see their works which were really very nice and creative

Alas, I could not take much pictures as I had tough time in controlling and guiding them. One more thing there was not enough light in the room for me to take pics. 
Here are some:

In one of the classes I taught them making greeting cards. Here is one class where the children worked with, paper streamers, satin ribbons, stickers and card stock. 


I enjoyed interacting these children as this is the first time I was teaching arts and crafts to such a group. I don't know what they learned from me :) But I learned a lot from them. But they did enjoy my classes and wanted to have more classes. Well that is a pat on my back.

All in all we all enjoyed and I am now confident that I can handle small kids too:) I didnot even notice how the time flew by in these classes.

Some more next time..

Oh I will also be posting my creations shortly. But with heavy power cuts, I am not able to log on to my blog for long periods.


Wednesday, May 8, 2013

Designer Coasters and Cup Covers-4

With Kundans....

Here is one more with kundans. 
I have used two different coloured butterfly kundans.
In the center I have used a round kundan and paisley shaped ones.

Some more in my next posts...... 

Tuesday, May 7, 2013

Designer Coasters and Cup Covers -3


With Kundans.....

I have used butterfly kundans. They can be stuck to the coasters with glue.

I am sorry for such a bad quality of pictures. It is very difficult to take photographs of shiny objects.

Some more in my next post......


Monday, May 6, 2013

Designer Coasters and Cup Covers-2

With Sea Shells.....

Here is one more.
 Coaster
Cover

The small conch shells also have holes for stitching. These are actually used in embroidery.    I will get some without these holes so that I can use for this project. I have shown here two sizes of the conch shells. We can just glue them on to the coasters/covers.

Some more in my next posts...Keep an eye on my blog....


Saturday, May 4, 2013

Designer Coasters and Cup Covers-1

With Sea Shells....

While organising my stash of craft and hobby supplies, I unearthed some coasters made of fine soft wood. They are off-white in colour. Actually I wanted paint on them. Till now I could not do the project. I always pick up some plain ones so that I can add my own creative mark on them and gift it to my friends and relatives.

Today early in the morning around 3.30 am, I got up feeling very uneasy and breathless. So to quite my mind, I started taking deep breaths and tried to divert my mind somewhere else. In the process I remembered these coasters and some ideas flashed through my mind. Immediately, I reached for my journal(which, I always keep near by), in which I jot down my ideas first as they strike me and scribbled on it. Later on I tried some of my ideas.

Well here is one of them...I tried with sea shells.
 This is for the coaster or cushion for cup/glass.
This is matching cup/glass cover or lid. We can just glue these shells using a good glue. These coaster can be painted first as per the kitchen decor and then the shells can be glued.

Here you can see the holes on the shells. Actually these are meant for embroidery. I just tried them on to see how they look and when actually making one, I will use those with out the holes.

So if you like my idea, have some sea shells with you, or you are lucky one living near sea side, pick some up and try it out.

Some more in my next posts.....


Monday, October 1, 2012

Coconut Crafts once again...

I want to introduce to you various Arts and Crafts through this blog of mine. So here is one with coconuts and other parts of the coconut palm.Coconut is one of the most popular palms in India more so in South India. The entire tree has many uses. You can read about it here:
But in this post I am talking about the crafts made from various parts of coconut palm. In one of my previous posts I have posted some crafted items:

I remember my childhood days spent in my maternal gran's place. There were some coconut palms. My gran used to weave the leaves to make mats and many other things. She also used to weave small baskets or balls fill it with snacks like roasted peanuts, puffed rice or such things for us. She also used to make dolls from the leaves-a groom and a bride. We used to dress them up and play with them. I learnt to make the dolls from her but now I don't remember. If I lay my hands on some coconut leaves, I will ask my mom to make some so that I can post them here. Oh and also a whistle - my mom also used to make us one with the leaf fronds.

Here are the links where you can see how the leaves are woven not only in India but other South East Asian countries where these are found in abundance:


Here is one link where you can read about various ways the leaf fronds can be weaved:
http://nzetc.victoria.ac.nz/tm/scholarly/tei-BucMani-t1-body-d1-d4-d3-d2.html

Coconut leaves are also woven into different types of mats or structures for decorating the pandals(the place where marriage is performed) in South India. Since they are green in colour which indicates prosperity, auspicious and also  new life, they are used for decorating or erecting structures under which all suspicious occasions are celebrated especially marriages. They are also natural, environmental friendly, cool and available at no cost.


Here are links where you can see how coconut leaves are used for decoration.
http://malayalamscrap.com/scrapcard/coconut-leaf-decorations-1

http://malayalamscrap.com/scrapcard/coconut-leaf-decorations-3
http://make-handmade.com/2011/12/02/palm-leaves-art-wedding-gates-weaving-%E2%80%8B%E2%80%8Bof-coconut-leaves/
http://www.dinodia.com/ImageBigView.asp?ImageID=120729

Watch out for more of Arts and Crafts in my next posts....

Saturday, June 26, 2010

Cane Products


Cane belongs to grass family like Bamboo. It is tall grass, perennial with woody but flexible stalks and grows in wet soils. The word Cane is supposed to have derived from Hebrew"qanah" meaning reed. 

Cane has been in use since ancient times. It is used for making furniture, walking sticks, boats, roofing and baskets.Cane is natural product, light weight, comfortable, aesthetic. It is strong yet easily bends. That is why cane furniture and baskets are so popular. 


I have come across some lovely trays and picnic baskets. But they were quite costly. I have bought some trays and some containers for flower arrangements from time to time. However in this post I am showing you a very unique container made of cane. I bought it just yesterday. This is so lovely, in the shape of a Swan. I could not resist it.
 This is how it looks.
See its beak and its tail.
See the weave.
There is a lid. See the space inside.
You can fasten the lid.
This is the base to give it balance.


I think this can be used to store small jewellery, cosmetics or as a bread basket or for any such thing. What do you say? Any ideas how this can be used?

Sunday, March 28, 2010

Terracota-2

Here are some more of the terracotta.... Hope you like them. Please leave your comments.
You can see little Ganesha hugging Shiva Linga. You can also see the vases in the back ground, painted in metallic shades. On one of them you can see fishes and underwater plants, on the other you can see the bunches of the grapes.
This is the face of Ganesha. This can be hanged on to a wall. See the way it has been decorated.
These are some of the shell and conch shell shaped plant holders. These can also be used for other purposes depending upon our creativity.
Here are some more plant holders. These can also be used as decorators. It can filled with water and then flowers can be floated in them or fragrant candles can also be floated.
Here you can see some more wall decorators.You can see the Sun God riding the chariot with seven horses, representing the seven colours of VIBGYOR. Then there is the fish. Next to it is again Sun God.You can also see the conch shell and lamp container.
Now here is the Soop (in Hindi) and Chaata (in Telugu), which is widely used in Indian Kitchens. It is made of bamboo strips woven like a basket. It is coated with cow dung, or pulp of fenugreek seeds and paper soaked over night in water, grounded to a thick paste along with turmeric. This seals the holes between the woven bamboo strips and retains the grains in it . This is basically used to separate the husk , small stones from the hand pounded grain. Its also used for separating the broken grains from the unbroken ones. But I could not find the correct English word for this. If some knows it then please tell me.You can see the grains. How skilled the artist is....

Sunday, March 14, 2010

Terracotta-1

Terracotta is derived from Latin word "Terra Cocta" meaning cooked earth or baked earth.. It is made from clay and is plain unglazed ceramic. Terracotta usually refers to those items which are made with hand or rather not made on potter's wheel.

Terracotta colour is a brownish orange colour. But the exact shade may vary depending on the properties of the clay used locally.

Terracotta in India has been used since ancient times since Indus valley civilization. Its used for pottery, bricks, shingles, votive figures of animal, gods and goddesses. Figures of horses, camels, elephants, tigers, monkeys, bears, bullocks, serpents, birds etc are made in Uttar Pradesh, Gujarath, Jhabua and Bastar regions of Madhya Pradesh and Darbhanga of Bihar. In Darbhanga of Bihar the figures are painted in bright colours. Similarly in Tamil Nadu too horses and other figures are made of clay. These are then offered to the local deities.

In rural India, roof tops have always been covered with natural materials, one of them being the tiles or shingles made from clay or terracota. You can find these even today. Its easy to make, cheap and effective. But it requires replacement due to wear and tear with the passgae of time. Its also natural and easy to dispose off as it becomes dust and quite Eco friendly.

Terracota pots have also been in use in India. Either plain or decorated are used for cooking, cooling water and for decorative purpose. In the recent years, we Indians have again started using terracota products for decorating homes and gardens.

Here are some of the products- quite artistic and beautifully made:


See the bells. Two of them have been painted silver colour. these are hung in the gardens or in the front of the houses. The big one can also be used for covering an earthen ware lamp (Diya) to protect it from wind. The holes on it would allow the light.

Here you can see some more including the lanterns and bells which can be hung from trees in the garden.

This is a wind chime made of terracotta. I wanted to paint it. But did not have time yet. Its hung in my garden. I doubt whether even a hurricane would make it chime. LOL! :) :) . But it produces a beautiful sound, though not as much as a metal one.

You can see a terracotta parrot perched on one of the bells.

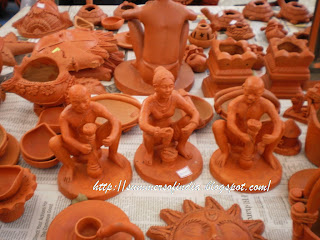
Here you can see some figurines of artisans at work. A lady and two men. These are used as decarators in the gardens, or in homes.

Here you can see two candle holders, one with the handle, and the other black one shaped like a tabla. There is a swan lamp, and a conch shell shaped plant holder.

The swan lamps, and a pot with a wine round it and boat shaped candle holders.

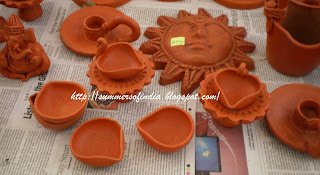
You can see some simple lamps. They are called diyas, which are lighted by using wick and oil in our prayer rooms, or for decoration or any religious/festive occasions.
 
These are a few of the beautiful items our craftsmen make. Especially the ones from Bengal are very skilled ones. They make some of the most beautiful ones. Hope you like them. Please leave your comments if any.
 
Keep an eye on my blog for more.....